

How to Setup AI Addon with Your Bot
LifeBots bots (Lite & Full types) include the AI Addon, which allows you to enable AI features with multiple models and functions. Follow this guide to set it up.
1. Enable AI Addon
- Go to the Dashboard.
- Click your bot.
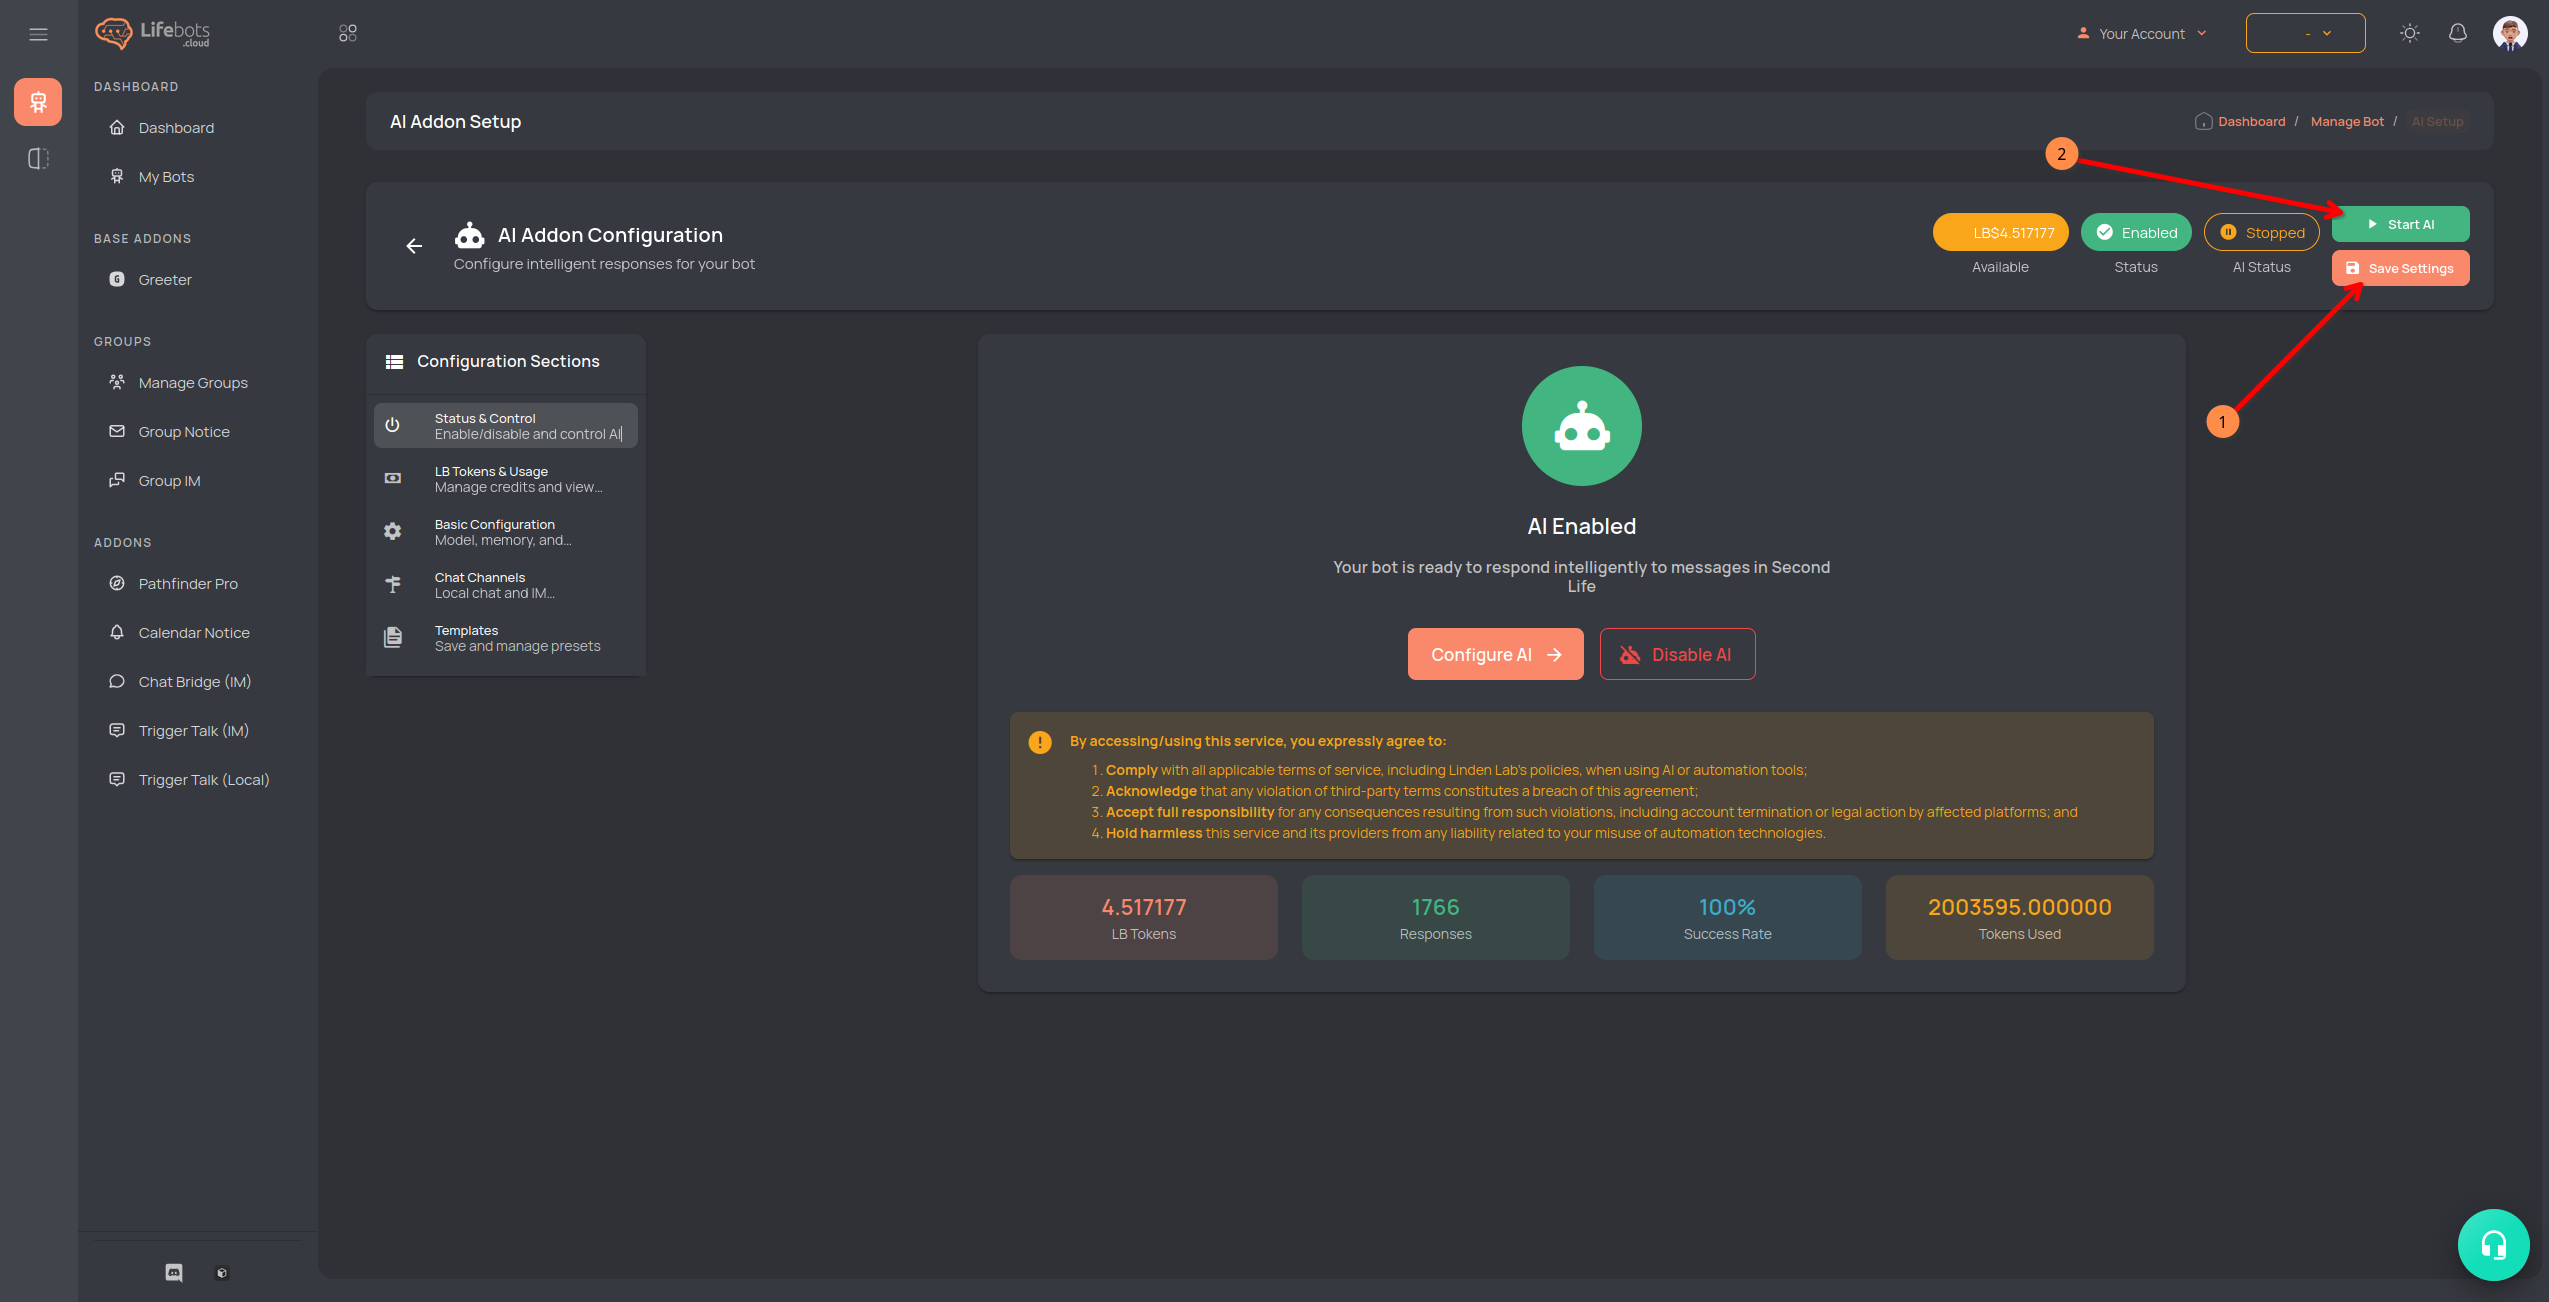
- On the Manage Bot page, click AI Setup.
- Click Enable AI.
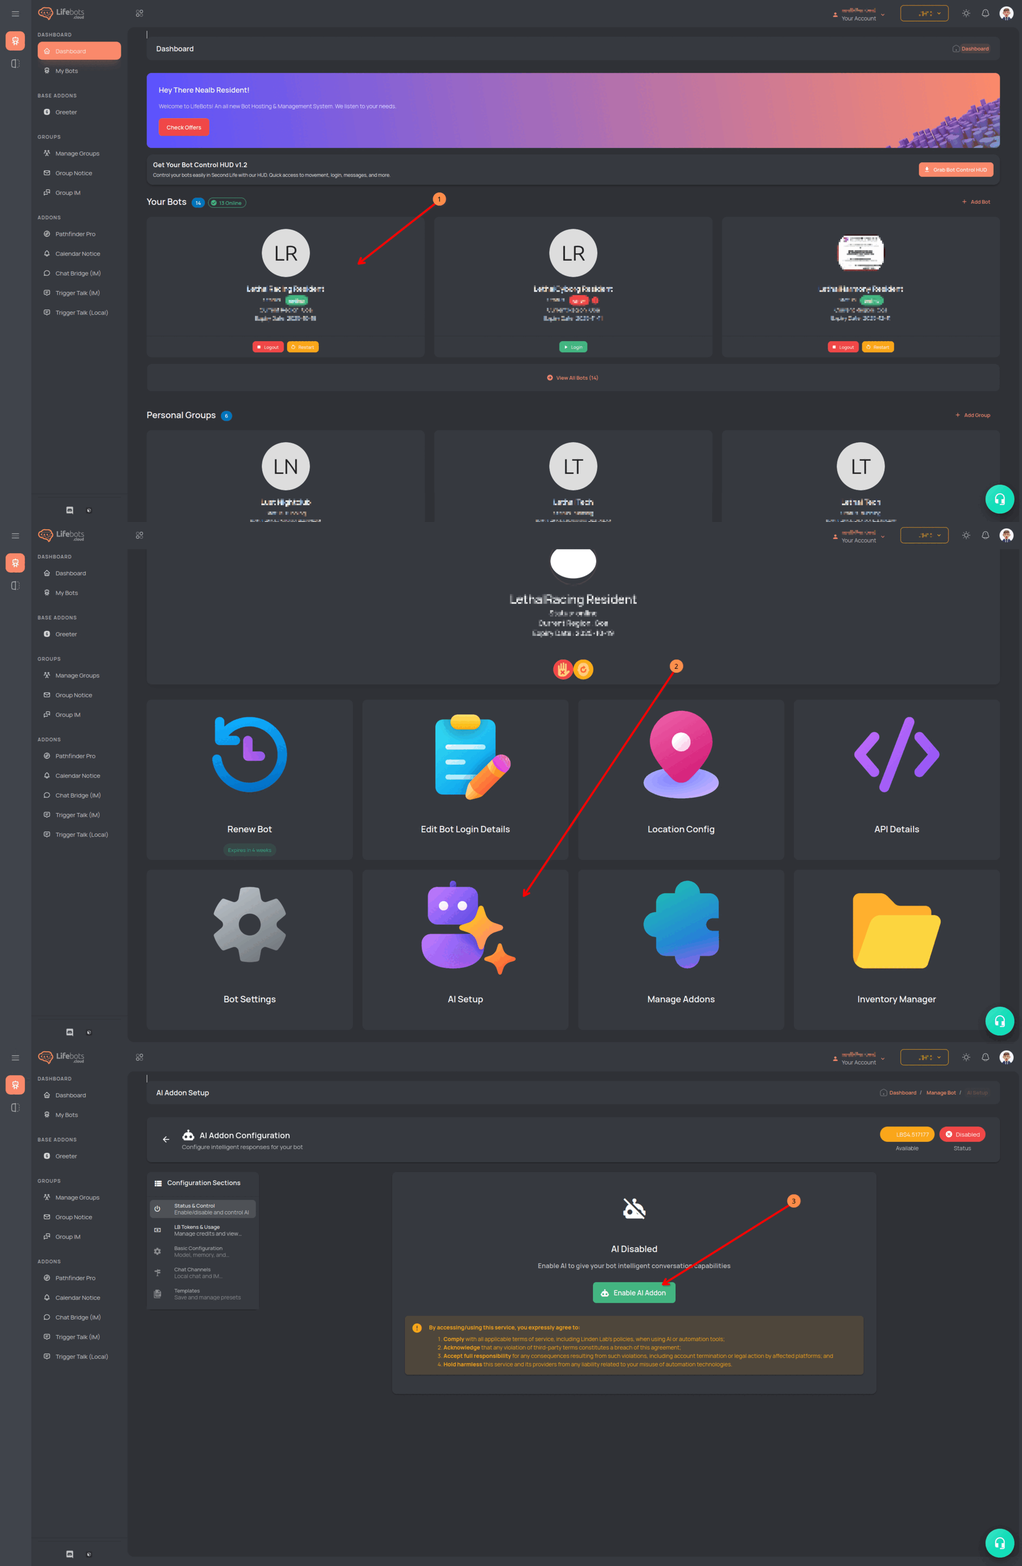
🔹 Once enabled, you’ll need LB Tokens (credits) to use AI.
2. Purchase LB Tokens
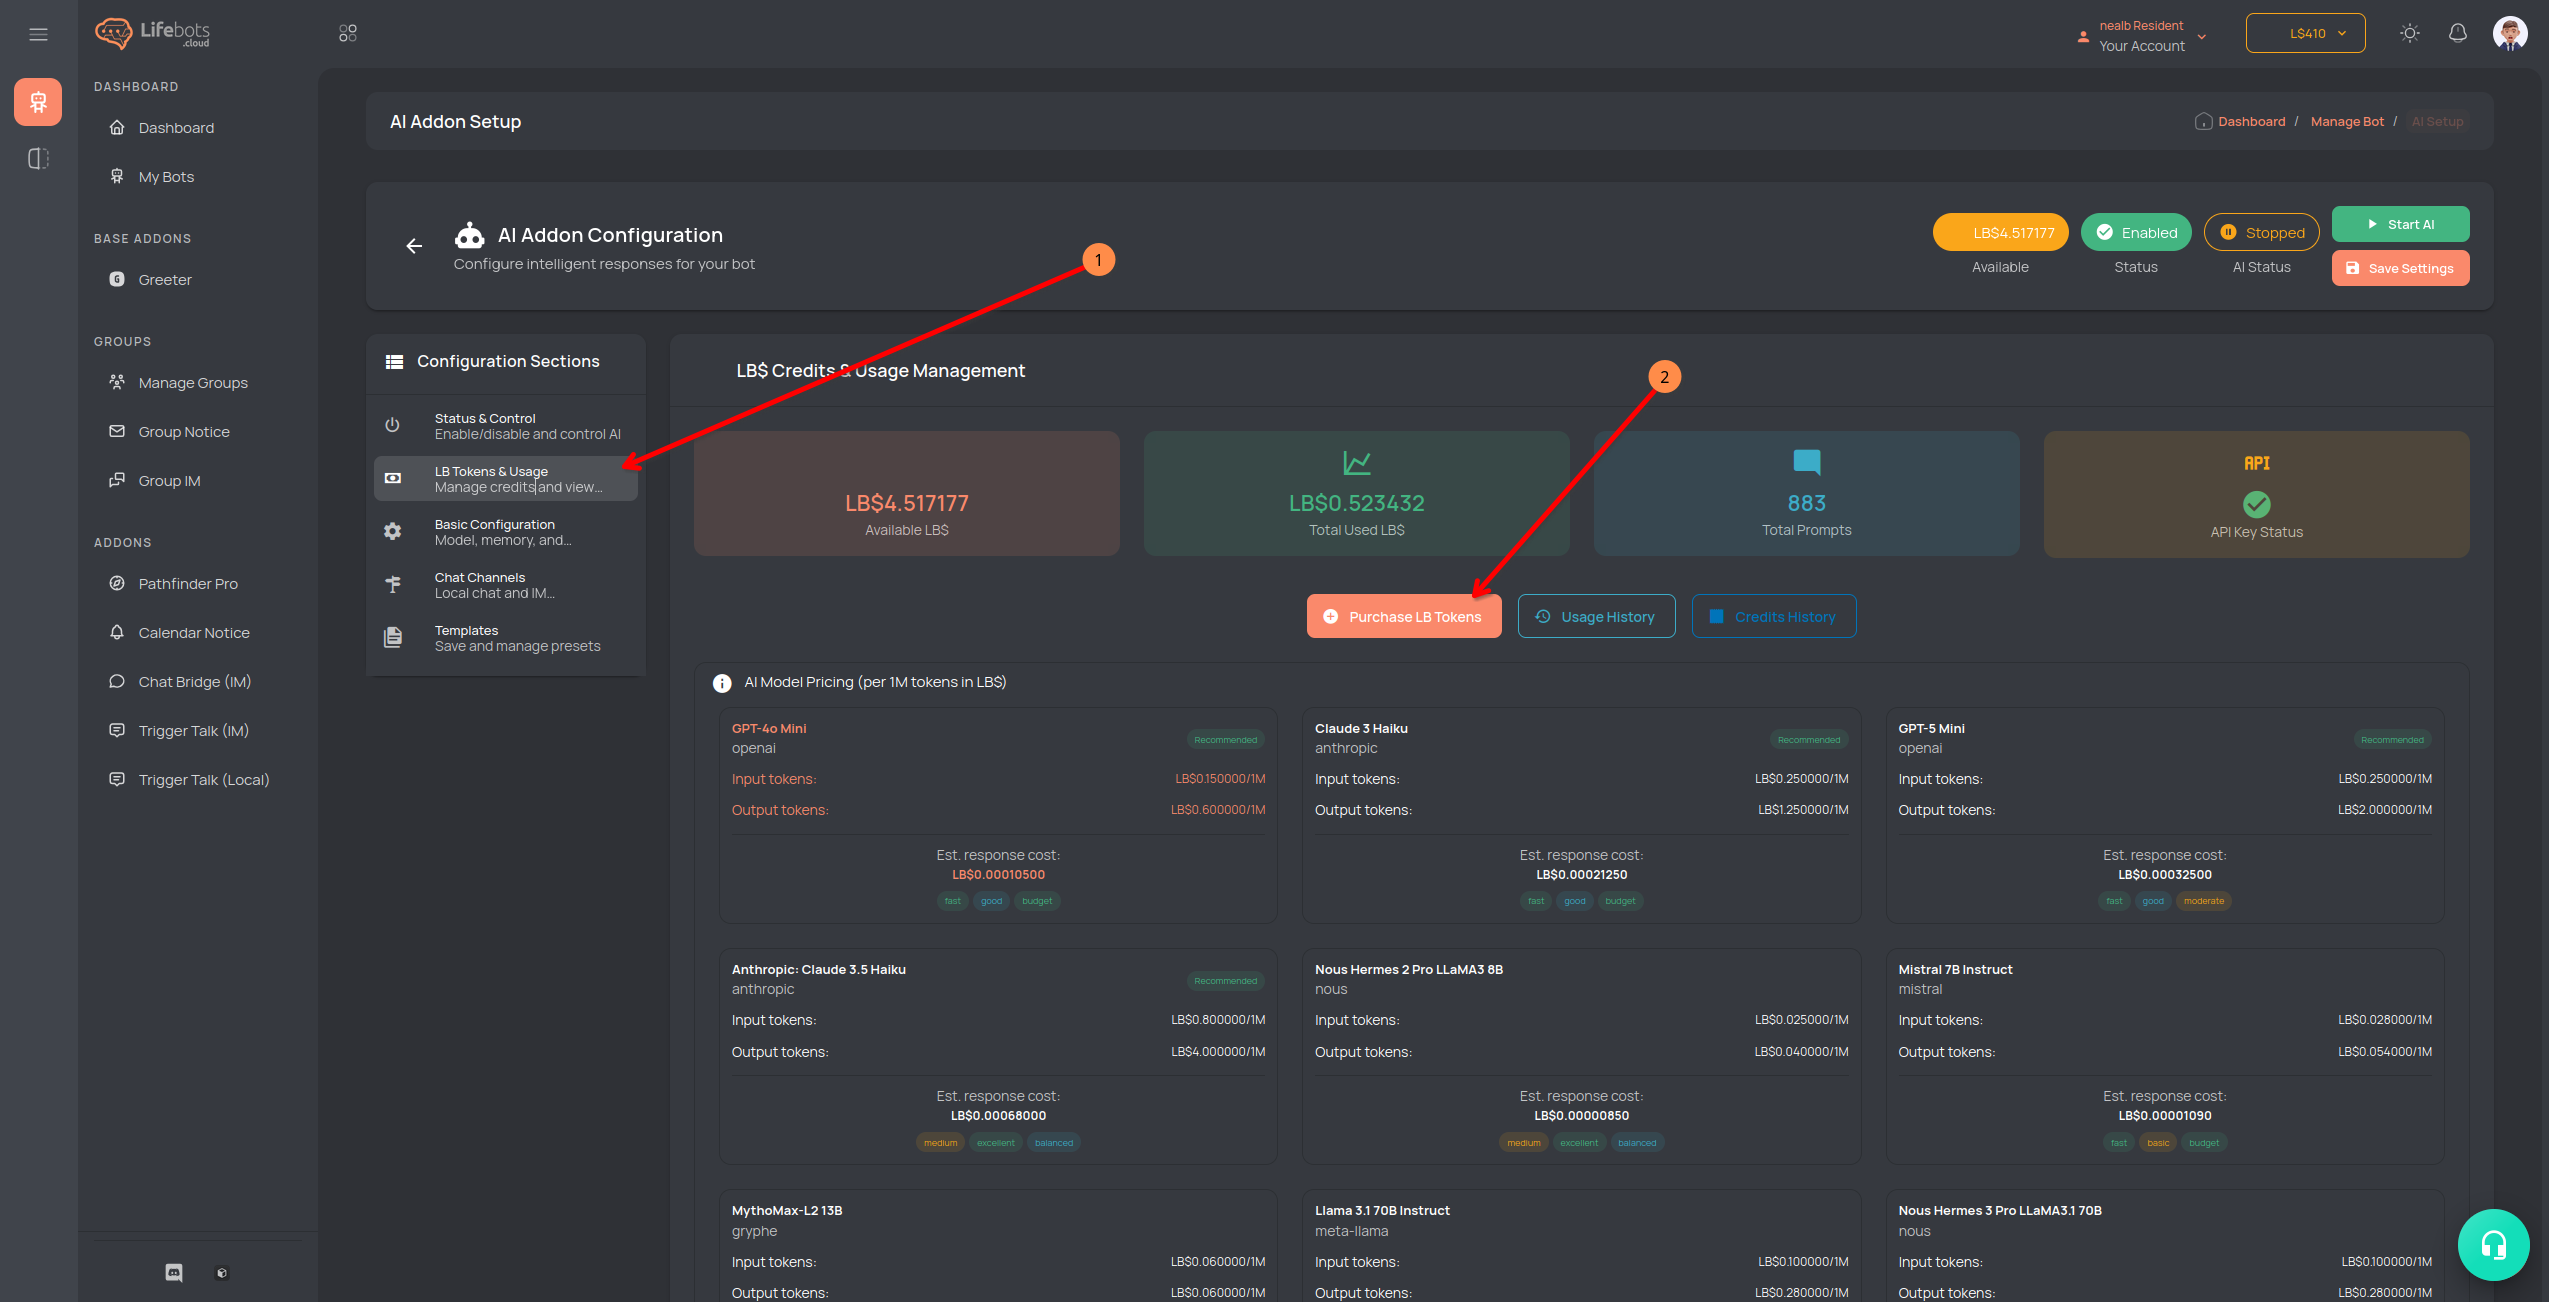
- In the AI Setup side menu, click LB Tokens & Usage.
- Click Purchase Tokens.
- Choose a package and pay with your LifeBots Wallet Balance.
3. Quick Setup Wizard (Fastest Way to Start)
If this is your first time, the wizard will open on its own after you enable AI. You can also open it any time:
- In the AI Setup side menu, click Status & Control.
- Click Quick Setup Wizard.
The wizard walks you through six steps:
- Category – pick Assistant, Business, Roleplay, Security, Entertainment, Education, or Other.
- Type – pick the preset that matches what your bot is for.
- Details – set the bot’s role name, personality and knowledge.
- AI Settings – choose the model and response length.
- Channels – choose whether the bot replies in Local Chat, IM, or both.
- Review – check everything, then apply.
🔹 The wizard fills in the same settings you would set by hand in the sections below. You can still change anything afterwards.
4. Configure Basic AI Settings
Once AI is enabled:
- In the AI Setup side menu, click Basic Configuration.
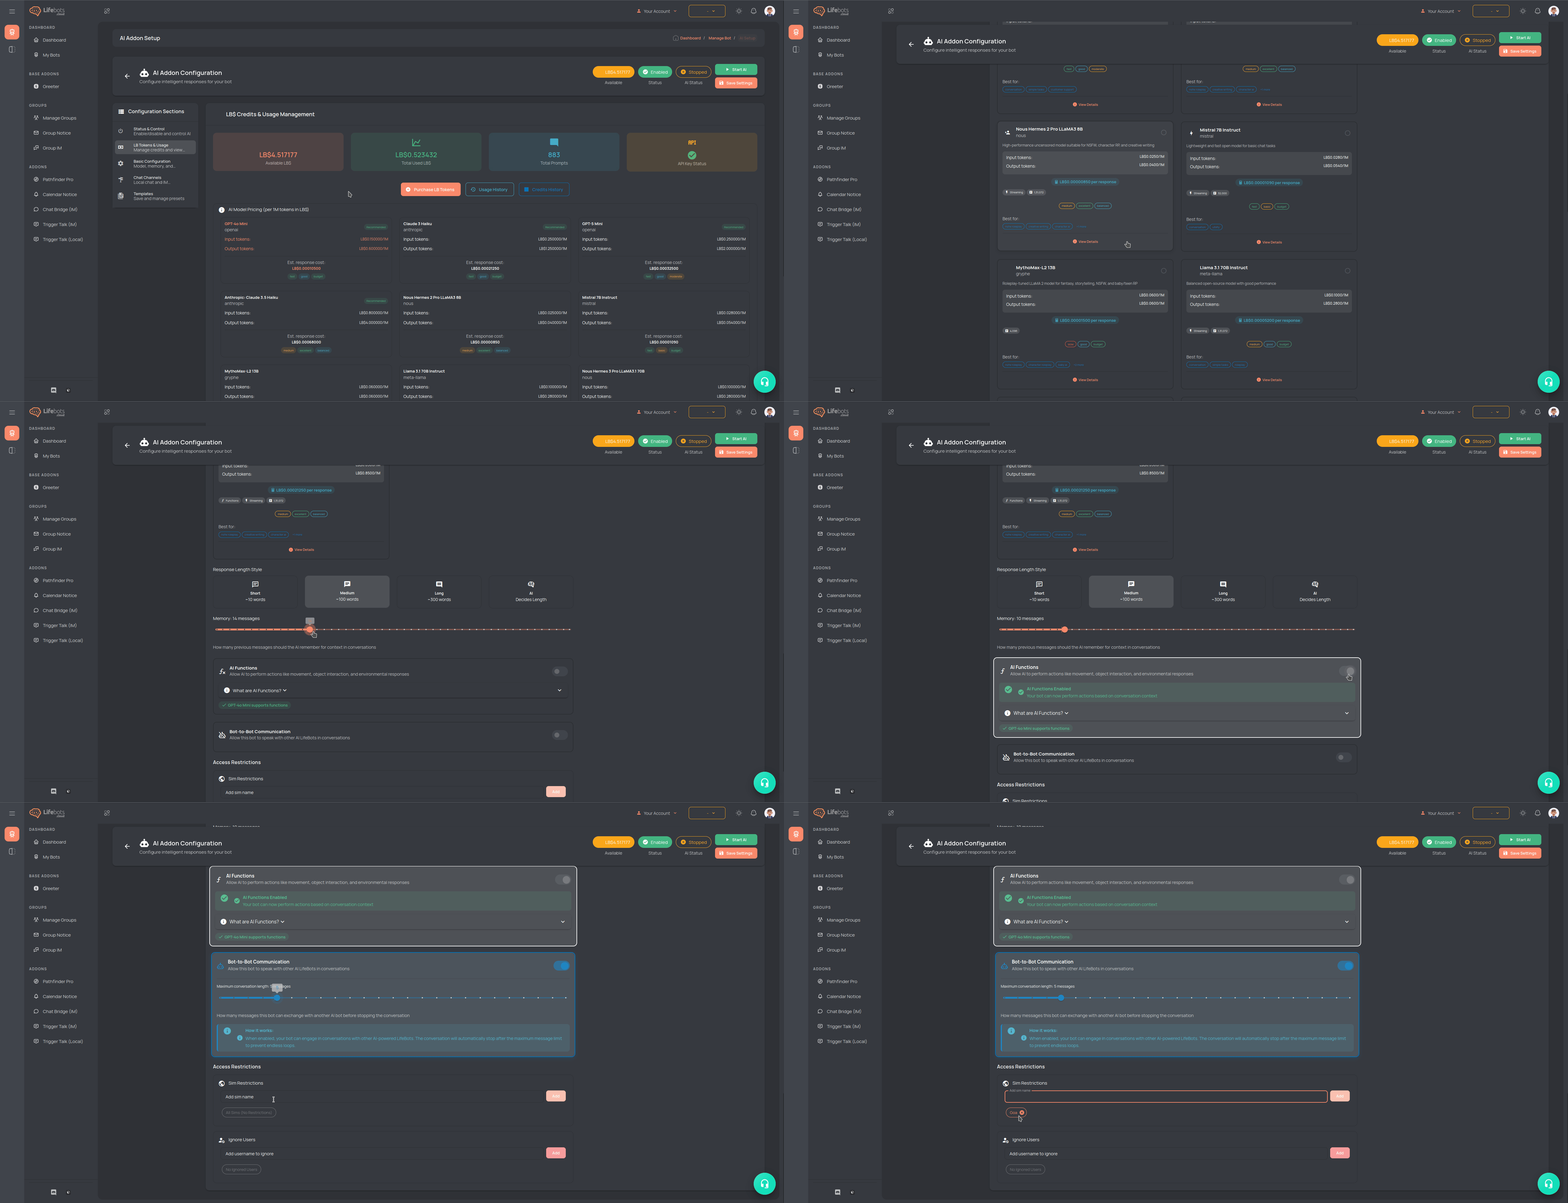
Here you can set:
- AI Model – each model card shows its estimated cost per response, based on the response length you pick.
- Response Length Style – Short (~10 words), Medium (~100 words), Long (~300 words), or AI Decides Length.
- Memory – how many past messages the bot remembers.
🔹 Some features need a model that supports function calling. If you pick a model that does not, the AI Functions, mood, animation and sound options will show as unavailable until you switch models here.
5. Advanced Features
- In the AI Setup side menu, click Advanced Features.
This section holds everything beyond basic chat:
- AI Functions – let the AI take actions in world, such as move, sit, stand and touch.
- Avatar Memory (Full bots only) – the bot remembers details about avatars it has spoken to before, so a returning visitor is recognised. This is separate from the message memory in Basic Configuration, and it uses extra tokens.
- Bot-to-Bot Communication – allow two bots to talk to each other, and set the maximum conversation length.
- Object Communication – let scripted objects talk to the AI. Use the slider to cap how many messages one object may send per conversation.
- Allow Outfit Changes (Full bots only) – the AI can change the bot’s appearance.
- Follow-up Messages – the AI may send a second message after its reply, such as an emote followed by speech.
- Mood System (Full bots only) – the bot’s personality shifts with the conversation. You choose the available moods, how quickly the mood decays, and the guidelines the AI follows.
- Animations (Full bots only) – the AI can play animations you have added to a curated list. For each one you set an AI Label (the name the AI sees), a description, a cooldown, a duration, and any linked sounds.
- Sounds (Full bots only) – the AI can play sounds from a curated list, with the same AI Label, description, cooldown and linked animation options.
Access Control
- Whitelist – when switched on, the bot replies only to the usernames you add. Everyone else is ignored.
- Ignore List – usernames the AI will never respond to.
- Sim Restrictions – add sim names to limit the AI to those regions. Leave the list empty to allow all sims.
6. Configure Chat Channels
- In the AI Setup side menu, click Chat Channels.
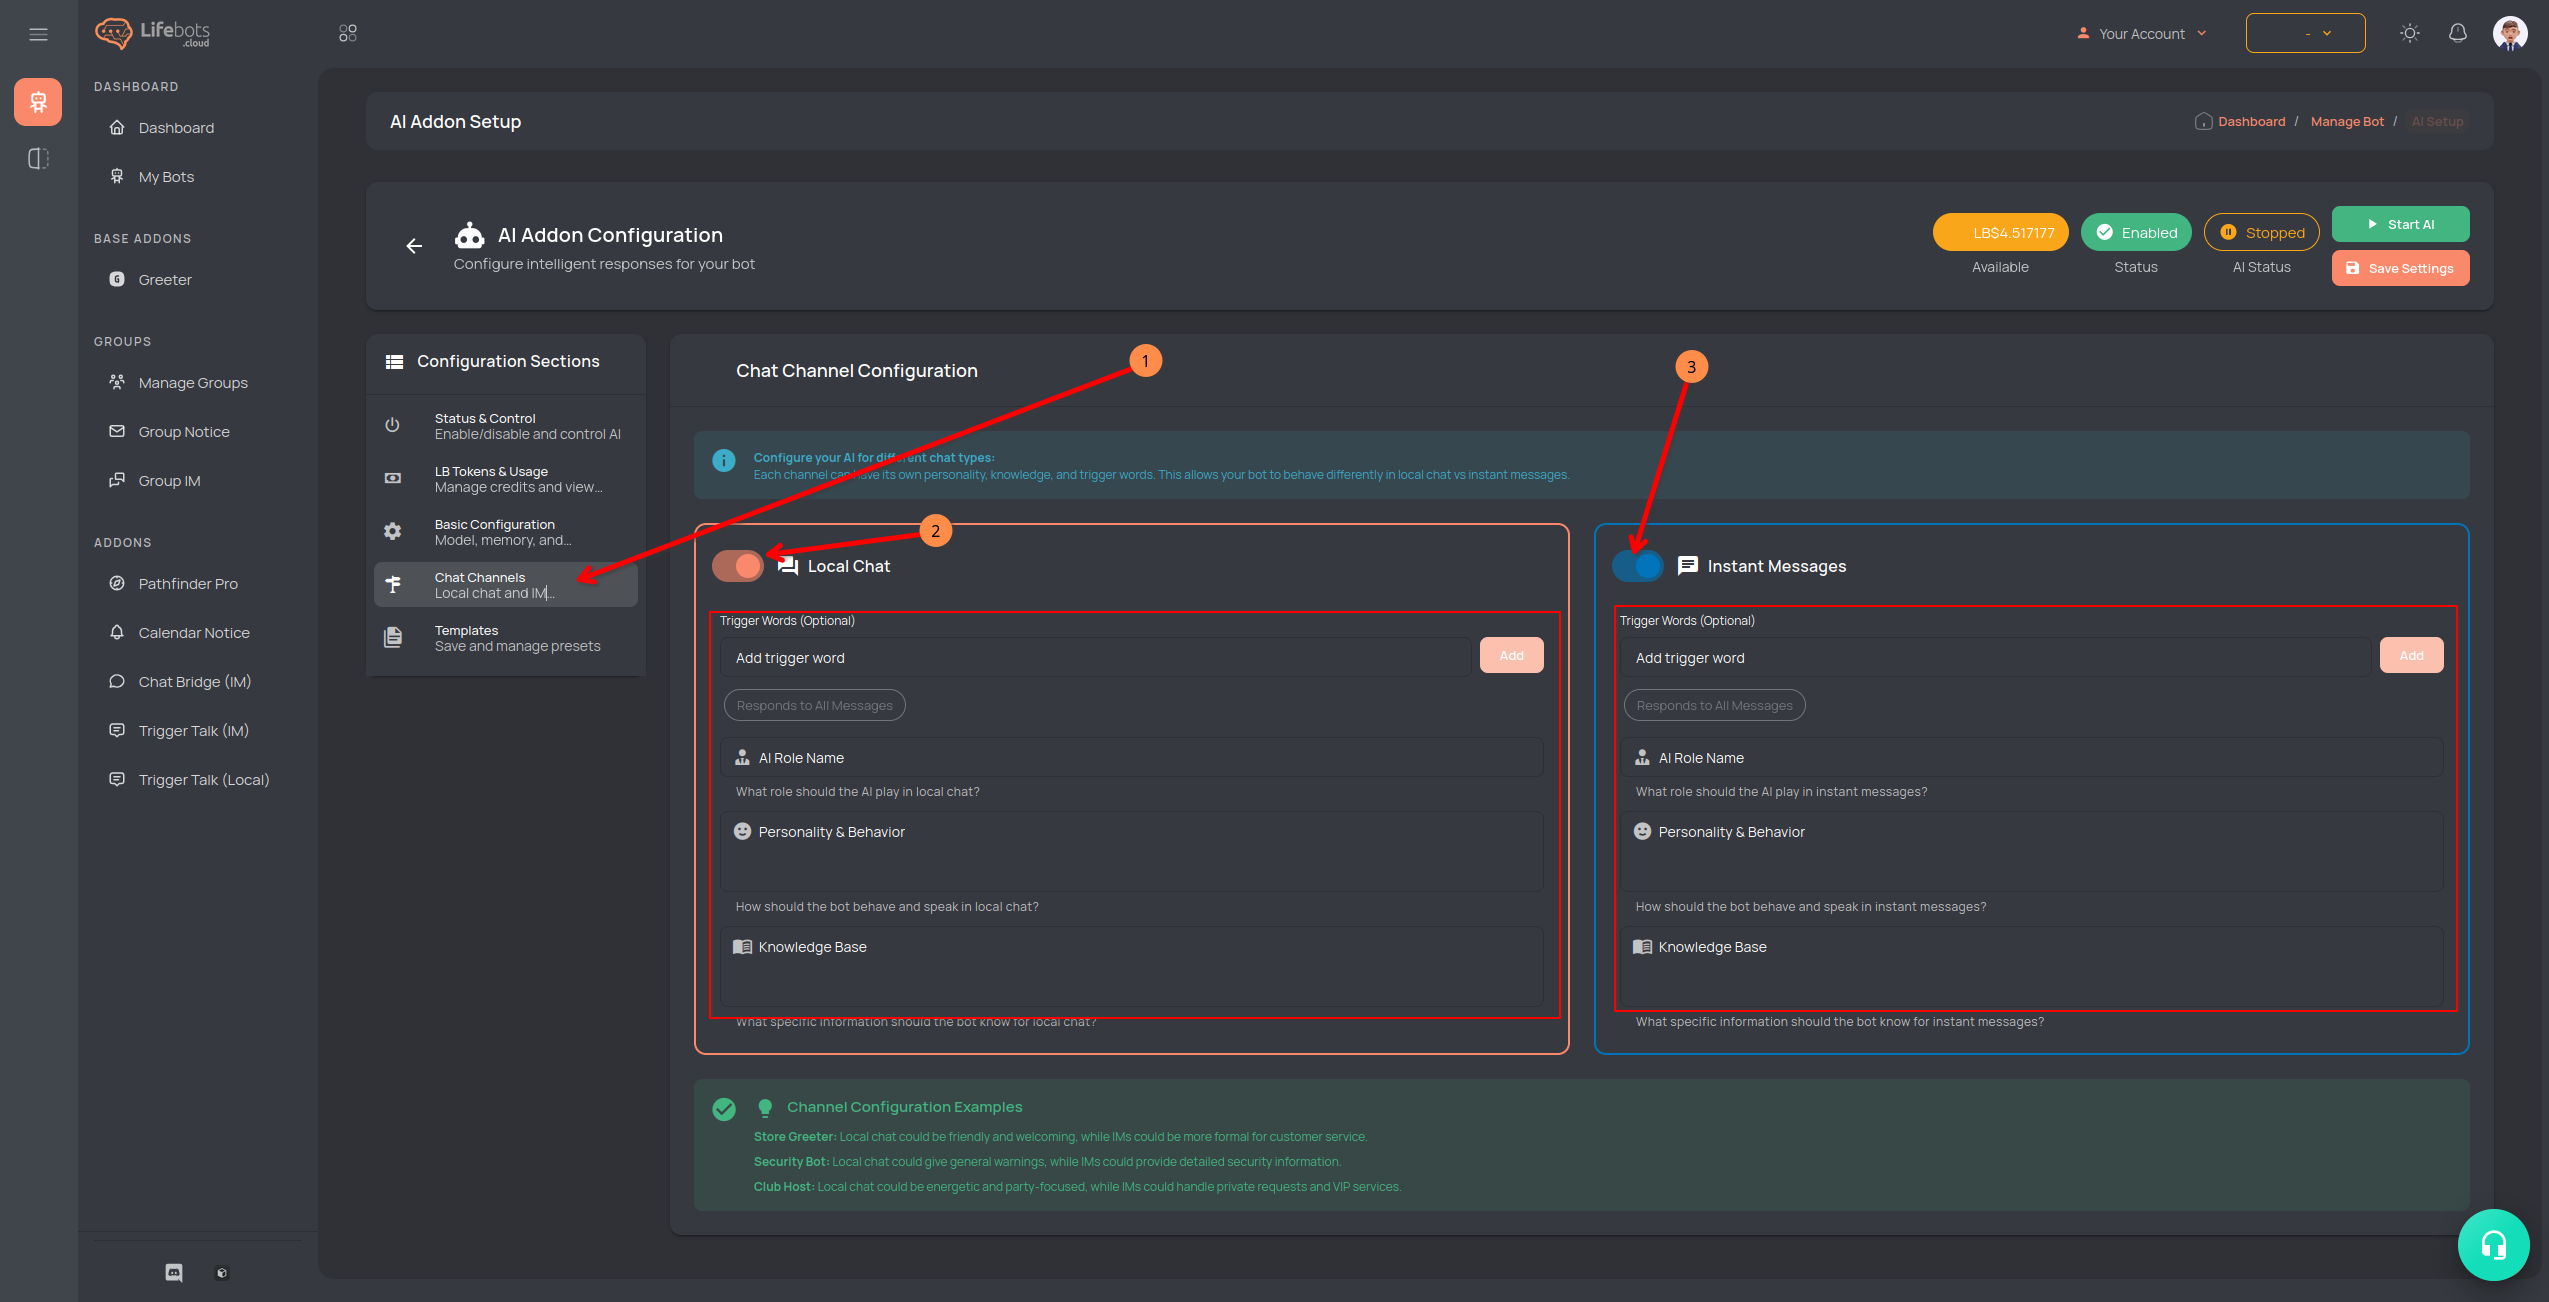
For each channel (Local Chat and Instant Message), you can set:
- AI Role Name – the role the AI plays on that channel, typically the bot’s name.
- Trigger Words (optional) – the bot only responds when these words are present.
- Personality & Behavior – define how the bot should act and speak.
- Knowledge Base – the specific information the bot should know for that channel.
- Response Delay – switch this on to make replies arrive at a human pace instead of instantly.
- Typing Speed – Slow (60 WPM), Average (90 WPM), Fast (120 WPM), Very Fast (180 WPM), Expert (240 WPM) or Instant (300 WPM). The page shows you how long an example reply would take at the speed you pick.
🔹 Local Chat and Instant Message are configured separately, so your bot can behave differently in each.
7. AI Voice (Full Bots Only)
- In the AI Setup side menu, click AI Voice.
- Switch the section to Enabled.
Voice lets the bot speak and listen in spatial voice. Set up:
- Voice reply model – the AI model used for spoken replies. Pick a faster model here, because voice needs a quick answer.
- Voice Persona – an AI Role Name, Personality & Behavior and Knowledge Base just for voice. Leave any of these blank and the bot uses your Local Chat settings instead.
- Voice – choose from the LifeBots voice list, or switch on Use my own key to enter your own ElevenLabs API key and paste a voice_id. In your own key mode you can click Fetch My Voices to browse your library, and you pay ElevenLabs directly.
- Stability, Similarity Boost, Style and Speaker boost – fine tune how the voice sounds.
- Speech to text – choose ElevenLabs Scribe or OpenRouter Whisper to control how the bot hears people, and optionally set a language.
8. Templates
- In the AI Setup side menu, click Templates.
Templates save a personality setup so you can reuse it:
- Click Save as Template to store your current role name, personality and knowledge.
- Use Quick Load Template on a chat channel to apply a saved template to that channel.
- Browse by Category or use the search box. System templates are provided by LifeBots and Public templates are shared by other users.
🔹 Templates are the quickest way to give Local Chat and IM two different personalities without retyping everything.
9. Save & Start AI
- Click Save Settings (top right).
- Start the AI.
- If the AI doesn’t enable, restart the bot.
✅ Done! Your bot is now powered with AI and ready to interact.